DIY your next notebook

My name is Brubey Hu, and I am The Ontarion’s graphic designer.
With interests in publication design and book arts, I am always fascinated by the formal quality of books and how they transform reading into a physical and aesthetic experience.
Bookbinding refers to the process of assembling papers together into a stack using threads and/or glue.
There are numerous ways of binding books, from hardcover binding, used to protect sacred contents like those found within a Bible, to perfect binding — an inexpensive method that is largely used for magazines and promotional brochures.
I personally enjoy binding blank books for notetaking and doodling, but you can bind books for diaries, recipes, and more.
Here is one simple bookbinding method which uses cheap and readily available materials.
The five-hole pamphlet stitch
Materials:
Bookbinding Terms
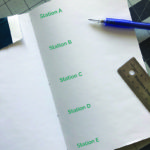
Sewing Stations:
The spots through which you sew
Spine:
The edge where the pages are gathered and bound
- Printer paper x 10 (inside pages)
- Cardstock x 1 (cover, same size as the inside pages)
- Wax threads (2 ½ times the height of the spine)
- Needle
- Awl (or pushpin)
- Ruler
- Pencil
- Clip
- Bone Folder
Instructions:
- Using the bone folder, fold the printer papers in half and stack them together.
- Using the bone folder, fold the cardstock in half and stack it outside of the inside pages. Then use the clip to hold all of the papers together.
- Using the ruler and pencil, mark five sewing stations on the folded line. See Diagram 2 at the bottom of this page. First mark Station C in the exact centre of the spine. Then mark Station A half an inch away from the top edge, and Station E half an inch away from the bottom edge. Station B goes to the centre between Station A and C; Station D goes to the centre between Station C and E.
- Use the awl or pushpin to pierce the sewing stations.
- Thread the needle. Do not tie a knot, leave a loose end.

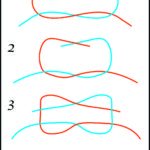
Diagram 1 - See Diagram 1. Start binding at Station C. Pull your needle through Station C. Leave about three inches of thread.
- Go through Station D.
- Go through Station E.
- Go through Station D again.
- Go through Station B.
- Go through Station A.
- Go through Station B again.
- Go through Station C. Tie a square knot around the long stitch that crosses over Station C. See Diagram 3. Cut the excessive thread.
Images by Brubey Hu
A version of this article appeared in print in The Ontarion issue 190.1 on Jan. 4, 2021
Please visit www.theontarion.com/submit to find out how you can share your work with The Ontarion.